Showing posts with label side dish. Show all posts

9.09.2009

Making Fresh Mozzarella

Both Alisse and Becca have asked, so I thought I better hurry up and explain how I went about making fresh mozzarella, mostly based off this recipe.

It all starts with milk.

That seems obvious: Cheese = milk + mold + magic, or something like that? I don't think there was any mold in my process, but there definitely was milk, and the rest seemed like magic!

So, we start with the milk:

When looking for milk to make cheese out of, reportedly raw milk is best- but that's mostly illegal- and the next best thing is whole milk that is NOT homogenized and NOT ultra-pasteurized. To be on the safe side, I got whole organic milk that was as minimally processed as I could find. I bought a half-gallon because I wasn't sure how this was going to work, and I'm cheap.

The other critical supplies:

Rennet and Citric Acid.
I found both at a natural foods store. I had to ask where to look in the store- I had no idea. Luckily, I had a friend who WORKS in a natural foods store along with me on the trip, and he was able to give me some ideas. Hint: Rennet is refrigerated.

Dilute 1/8 tsp rennet in 1/8 C (2 Tbsp) water. Set aside.
In a good-sized pot, mix 1/4 C water with 3/4 tsp citric acid. Add the milk.
At this point, it looks like we have milk in a pot:


Heat to 88 degrees. I only had a meat thermometer, which is probably not the best tool, but it worked. Remove the pot from the heat and add the rennet solution. Use a wooden spoon to stir with an up-and-down motion for 30 seconds to a minute, then leave the pot alone for about 10 minutes. This is the "magic" part"

While you're stirring, the curd will start to thicken.


After 8-10 minutes, the pot will (hopefully) look like this:


The curd pulled away from the sides of the pot and is now one big mass. Using a knife long enough to reach the bottom of the pot, cut lines in the curd to make cubes. I found out this is not as easy as the instructions make it sound. Hopefully yours will be prettier:


It doesn't really matter, though, because when you scoop out the curd using a slotted spoon, it won't hold its shape anyway:


OK, Miss Muffet fans, what had we just done?? Separated the CURD from the WHEY. Watch for spiders.

As you scoop the curd, squeeze as much liquid as possible from the curd. This won't be easy. Once the curd's in the bowl, even more whey will drain out of it. Pour as much whey as you can back into the pot of whey. Form the curd into one ball or a few smaller balls.

Put the pot of whey back on the stove, and heat till not-quite-boiling. Dip a ball into the hot whey until heated, then take it out and knead or stretch it until it cools and ceases to be pliable. This motion is working out more whey from the curd. You'll have to do this 5 or so times. Rumor has it, this is where you'd salt your cheese. My directions didn't exactly say when to do it, and I forgot. I recommend adding some salt- the resulting salt-less cheese is kinda tasteless.


When you've finally reached "fresh mozzarella consistency," heat the ball one last time, and form it into a well-shaped ball. Dip in ice water to cool, and store in water or wrapped tightly in the fridge. A half-gallon of milk created a ball of cheese bigger than a tennis ball but smaller than a baseball.


As for me? The cheese didn't last long. Less than 24 hours, in fact. With fresh tomatoes around, that is to be expected.

1.25.2008

Homemade Refried Beans

When I served these for dinner last night alongside tacos, my husband took a bite and then exclaimed "Wow!" They're good, really. And not so much more difficult than scraping the refried beans out of a can. Way more tasty & healthy!

Quick Refried Beans

1 can pinto beans
1 tsp sea salt
1 tsp cumin
1/2 tsp onion powder
1/2 tsp garlic powder
2 Tbsp salsa (or more, if desired)
1 Tbsp oil

Combine everything in a food processor or blender and pulse until the desired consistency is reached. Store covered in the refrigerator or heat to serve.

6.07.2007

Simple Steamed Veggies


It may sound silly- obvious, even- the simplicity of the steamed vegetable as a side dish. Unfortunately, I did not discover this beauty right off the bat. Our 'quick and easy' side to a meal consisted of throwing a few pieces of prepackaged frozen garlic bread into the oven. Tasty and filling, for sure, but, nutritionally, this was 'filler' rather than a proper addition to the meal. Periodically we'd eat canned or frozen corn or green beans, but that was about it.

Finally, I picked up some fresh vegetables at the grocery store. It may have been beans or broccoli, I don't remember. I discovered this pot my mom had given me a long while back- I think I had used it once or twice as a spaghetti pot, think it was neat that it had a built-in strainer. In case you haven't guessed- no, that is not its intended purpose. The pot is a vegetable steamer, used by putting about an inch of water in the bottom, bring it to a boil, then putting the perforated insert in the pot with the vegetables. Cover and let steam for less than 5 minutes, and it's done. Unlike cooking pasta, boiling the water doesn't take long because there's so little of it. Cooking the vegetables minimally enhances color and maintains nutrients. Quick and Easy. And Good for You!
Here's my favorite way to steam broccoli, inspired by Elise & Stephen:

Garlic & Basil Broccoli
1-2 heads of broccoli
2 Tbsp margarine
Garlic salt to taste
Dried basil to taste

Fill a pot with a steamer basket with 1 inch of water and set on the stove to boil. While waiting, cut the bottom 1/2 of the broccoli stem and discard (This is usually hard and no fun to eat.) Using a vegetable peeler, peel the stem the best you can to remove the tough skin. Cut the "trees" off and into similarly-sized florets. Cut the rest of the stem into pieces with a similar thickness as the stems on the florets. Place the broccoli in the steamer basket.

When the water in the pot is boiling, insert the steamer basket with vegetables, and cover. Let steam for about 5 minutes- use a timer. Overcooked broccoli is not only mushy, it's not as good for you.

Turn hot broccoli into a bowl and toss with margarine. Sprinkle garlic salt and basil to taste and toss. Serve immediately.

1 medium-sized head of broccoli makes two very generous servings.

6.04.2007

Macaroni & Cheese for a CROWD

For those rare times when you have a ridiculous number people to feed at large picnics, cookouts, family reunions, company events, or whatever it may be, large-batch recipes can come in handy. Smaller recipes don't always scale well.

This was my dilemma this weekend, when I had to make a serves-50 macaroni for an event. I had a Joy of Cooking recipe for "Macaroni & cheese for a crowd", but when I read it, it only filled 2 9x9 pans and made 16 servings. I was cooking for a different-sized "crowd".

Big-batch macaroni
4 pounds elbow macaroni
7 cups milk
2 pounds colby cheese, shredded (I couldn't find colby, so used colby-jack)
2 pounds sharp cheddar cheese, shredded
1/2 cup butter
3/4 cup flour
2 cups more milk
1 teaspoon salt
1/2 teaspoon white pepper
1 cup seasoned bread crumbs
-Or-
1 small box Ritz crackers, crumbled (I didn't know what a small box was. I used 2 1/2 stacks, if that makes sense. It was plenty.)
and mixed with
1/2 cup melted butter
1 lg. (18"x12"x3") foil roasting pan

Make a roux by melting butter, add flour and stir, then cook over low heat for 2 to 3 minutes while stirring constantly. Set aside to cool.

Cook macaroni according to package directions. (This is not as easy as it sounds. The package directions only accounted for cooking half a package at a time- and I needed to cook 2 packages! I used my two largest pots to boil water & cook the macaroni, and all was well.) Drain and put into foil pan. While macaroni is cooking, heat 7 cups milk, add cheeses and cook over medium heat while stirring to melt cheese. Add salt and white pepper. Add roux and stir constantly until well thickened. (I got distracted and didn't stir this constantly, and the bottom burned. Be warned.) Add this to macaroni and mix well to coat macaroni. (Not easy, again, because the macaroni already just barely fits in the foil pan. Add a little at a time, stir in, add a little more, etc. Otherwise you'll have a mess. I got help with this from my obliging husband.) Pour in remaining 2 cups milk (Again, slowly) and sprinkle with bread crumbs or Ritz crumbs. You may prepare it ahead and bake it later. Bake for about 1/2 to 3/4 hour in 350 degree oven.

5.27.2007

Easy Potato Wedges


This dish, and variations of it, is a quick, filling side dish. I like the fact that, with different spices, the potato wedges can fit a variety of main dishes as a side.
Easy Potato Wedges
2 large potatoes
2 Tbsp oil
spices of choice (I used garlic salt and thyme)

Cut the potatoes lengthwise into 6-8 wedges. Leave skin on.
Toss potatoes and oil in a bowl till the wedges are coated.
Spread wedges on a baking sheet and sprinkle spices on the potatoes evenly.
Cook at 475 for 20 minutes, turning halfway through cooking time.

These turn out crispy and well-seasoned, and we were pleased, especially because we were hungry! They could be dipped in ketchup, or typical baked-potato toppings, if you like that sort of thing.

4.04.2007

Baked Macaroni and Cheese

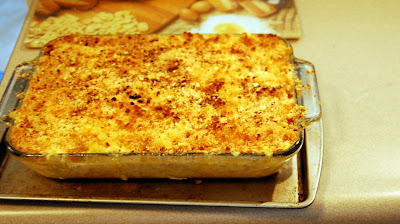
It was Sunday night when Josh turned to me and said, "So, what side are we bringing tomorrow?" In the midst of traveling last weekend, I had totally forgotten that we were eating dinner with our bible study group on Monday and we were bringing the side dish. Ack! So, I wracked my brain for what we had in the house, and what would go with dinner- barbecue pork sandwiches, potentially eaten on the patio, if the weather's nice. We were out of potatoes, so no potato salad... what else is a good 'cookout' food? Macaroni and cheese, of course!

I had never made macaroni and cheese from scratch, except in 7th grade home economics class, where I missed the day they made it, so I had to make it at home and bring it in to the teacher. That was my first attempt at a white sauce. I didn't try another one for 10 years.

I found a recipe online and modified it to what I had on hand (and what I thought sounded good!). All in all, this was a good recipe- the topping turned out crunchy like it should, but the macaroni in the casserole didn't dry out, which is a definite fear with this dish.

Here's the recipe:
6 tbsp. butter
6 tbsp. flour
Sprinkle of paprika
Salt and pepper
3 3/4 cups hot milk
4+ cups grated cheddar
1 lb. short macaroni, cooked al dente
1/2 cup heavy cream
3/4 cup crushed Ritz crackers

1. Preheat oven to 350°. Melt 6 tbsp. butter in a medium saucepan over low heat. Add flour and cook, stirring constantly, for about 4 minutes (flour mixture must foam as it cooks, or sauce will taste of raw flour). Stir in paprika and season to taste with salt and pepper. Whisk in hot milk, 1/2 cup at a time, and cook, stirring, until sauce thickens. (Joanna's note: The first 1/2 cup I stirred in thickened the mixture to a SOLID. I panicked. Stirring in the rest of the milk makes it liquid again. It has to cook for a while to thicken again.) Take off heat and stir in 2 cups of cheese. Stir until cheese melts.

2. Combine pasta and sauce in a large bowl, and season with salt. Sprinkle 1/4 of the remaining cheese over the bottom of a buttered 8" × 11" baking dish. Place one-third of the pasta in the baking dish, top with a layer of cheese, then repeat, layering pasta and cheese, ending with cheese, making three layers in all.

3. Pour cream over assembled macaroni and cheese. (Joanna's note: This worried me too. It did not look good. The cream just kind of sat on top of the casserole. Don't worry, it turns out alright in the end.) Sprinkle crushed Ritz crackers on the macaroni and cheese. Bake until crust is browned, about 30 minutes. (I turned the oven to Broil the last few minutes to finish browning- but I almost did it too long! You have to watch it!) Allow to rest for 15 minutes before serving.

From Cooking Fun
Comfort food at its best, seriously. My husband had some leftovers for lunch yesterday, and I'm eating the rest today (and looking forward to it!) This probably makes sides for 10, at least, and a meal for 6. We had 7 people eating off of it (and one two-year-old) and had less than a quarter of it left, but that was with most of us going back for generous second helpings!

Check out the rest of Make It From Scratch on Tuesday!

3.27.2007

A birthday and a Bowl

Originally posted on 2/4/07 at keeping feet


Sunday, while we were housesitting, I cooked Josh a birthday cake to take to bible study Monday night. It turned out fairly well. I used a tip that Melissa gave me last year and filled between the layers with pudding rather than icing, but I think I used too much, so it began oozing everywhere and making a mess while I was trying to ice the cake. The dark spots in the icing is where the pudding got mixed up with it and didn't dry very well. Ah, chocolatey goodness (More on that later).
The cake was from a mix, to simplify things, but I found a recipe for the icing that was really, really good.
Easy Chocolate Buttercream Frosting:
1 stick butter, room temperature
2/3 C unsweetened cocoa
3 C powdered sugar
1/3 C milk
1 tsp vanilla extract

Combine all ingredients in a large bowl and beat with an electric mixer, until frosting is creamy, 3-5 minutes. (Start at low speed to avoid getting sugar everywhere!)

I didn't have 3 C powdered sugar, I only had 2, so I tried to cut teh recipe into 2/3rds, which was hard to do in my head....

The cake was completely gobbled up by the 10 hungry people at small group Monday, and my parents were coming to celebrate Josh's birthday on Tuesday. What's a hostess to do? I threw together one of Josh's favorites, "pudding cake" (also called "dump cake" or "hot fudge cake") as they got here. There are no pictures, because it was gobbled up as well.
Pudding Cake:
3/4 C sugar
1 C flour
3 Tbsp cocoa
2 tsp baking powder
1/4 tsp salt
-Heat oven to 350. Mix above ingredients in a 8x8 or 9x9 pan. Blend in 1/2 C milk, 1/3 C melted butter, & 1 1/2 tsp vanilla and beat till smooth.
-Sprinkle 1/2 C sugar, 1/2 C brown sugar & 1/4 C cocoa over batter. Pour 1 1/4 C HOT water over the pan. Do not mix. Stick it in the oven & bake 40 minutes. Let stand 15 minutes before eating.

What I did NOT consider was that chocolate cake 2 days in a row makes us very sick of chocolate cake. I had planned on making a cake or cupcakes for a party today, and after Tuesday, we decided they would be white cake, for sure.

Wednesday I had off from cooking anything amazing. We did a breakfast-dinner, and I appreciated the simplicity of it. Thursday, Matt, Kristen, Cindy & Ducky all came over for dinner. It was great fun. Matt brought sausages and Josh braved the cold to grill them. I made pork-and-beans and (my favorite) garlic roasted potatoes, and Cindy made yummy brownies for us.
I would post the potatoes recipe, but, to be honest I didn't follow it at all. It was just an 'idea'. What I did: Start with a bag of red potatoes. Cut into wedges and toss with oil to coat. Spread in a baking pan skin-side-up and sprinkle with dried rosemary and garlic powder. Bake for 20 minutes covered with foil at 425. Uncover and bake for 15 minutes. Flip skin-down and bake for another 10-15 minutes.

Again, no pictures because this was gobbled up. I really meant to get pictures of the party, it was a good time.


Also Thursday night, before people started showing up, I cooked my own creation: Super Bowl Colts cookies to take into work Friday. By "Colts" I mean "blue and white". I told people at work they could be blue-and-white Groundhog Day cookies if they prefer. What I did:

I started with Betty Crocker's sugar cookie mix, as I always do for my sugar cookies. I added a little bit of flour (In retrospect, I probably should have also taken out some of the butter). I split the dough into 2 pieces, one slightly smaller than the other. To the smaller one, I added blue food coloring until I liked the color, worked it into the dough, and set it aside. I rolled out the white dough into a long narrow rectangle, and spread the blue dough on top of it. Starting from the LONG side, I rolled the dough into a tube and wrapped it in saran wrap and put it in the refrigerator to chill. (I forgot, I did this all while Josh was at choir Wednesday night) Thursday, I took the roll out and sliced these spiral cookies and cooked them in batches. (I managed to slice my finger as well, and have had to type this whole thing without the use of my left index finger. It's still there, it just has a band-aid on the tip.) They turned out pretty cool, and were eaten up at work.

My favorite part: The spirals sometimes appeared to form horseshoes or C's, for Colts.

Posted by Picasa

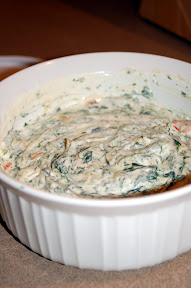
Last night, before we went to Lebanon, I threw together a spinach dip for a party tonight. This is the easiest, tastiest thing to do: Knorr spinach dip. If I have time, I might add more spinach, because I prefer spinach to sour cream.

I made it ahead because it gets better with age: the flavors meld while sitting in the refrigerator. We headed to dinner in Lebanon and had a delightful time playing games and visiting. We ate lasagna and even more chocolate cake.
-------EDIT-------
The cupcakes for yesterday's birthday party for Dave went over very well. They were cooked from a white cake mix from ALDI with a white icing also from ALDI. I added blue food coloring to half the icing. This was my first attempt at cupcakes, and first time using the silicone cupcake pan, which I decided I like very much. The downside: I only have 1 cupcake pan, which holds 6 cupcakes, so the 24 cupcakes I cooked took a total of 4 batches.


Cooking today will include sides for dinner when we eat in Muncie with Matt and watch the football game. I'll leave you with a picture I shot while on our way to Josh's parents house for dinner Friday night:

Followers