Showing posts with label snack. Show all posts

5.28.2009

Kale Chips

Kale's a new food for me. When I first heard about it just a couple years ago, I had to look up what it was! I bought it for the first time just this year, and stuck it in the aforementioned green smoothies. I had some left over, and wanted to see what else tasty I could make with it, searched for recipes, and came upon this snack food that other food bloggers were raving about. With the few leaves left in my fridge, I had to try it.

Kale Chips

Olive oil (1-2 Tbsps)
Vinegar or apple cider vinegar (1 Tbsp)
Sea salt
Kale leaves

Tear kale into bite-sized pieces, about 1-inch pieces. Put in bowl with oil & vinegar; toss to coat. Spread on a single layer on a baking sheet and sprinkle with sea salt to taste. Bake at 375 for 12-15 minutes, until crisp. Edges of leaves should be browned.

When I read a similar recipe, I didn't believe lettuce would get crisp, ever. I was highly skeptical. Amazingly, the leaves did get crisp, and were light and crispy and slightly salty like a good potato chip, but packed with good stuff, so I didn't feel bad eating all of them. In one sitting. Before dinner.

That picture is only half of the chips. I stopped eating long enough to record my experiment.

2.02.2009

Party food: Cheese straws

I got the aforementioned How To Cook Everything cookbook for Christmas. After I opened it, one of the first recipes that caught my eye was for "cheese straws". Why did such a strange recipe make me want to try to make it immediately? Because, in the description of the snack, the cheese straws were compared to Cheez-Its. I LOVE LOVE LOVE Cheez-Its. I don't let myself buy them because of the short time they're in the house. I devour them.

Anyway, back to cheese straws. I finally had an event where cheese straws would be an appropriate snack- a friend's weekend get-together & birthday party. Thanks to a busy morning, I had a very short time to get them mixed up, cut out, and in & out of the oven- and succeeded!

1/2 lb cheddar cheese
1/3 lb Parmesan cheese
2 cups all purpose flour
pinch Cayenne
1 stick cold butter
Ice water, if needed

Preheat oven to 450

Grate cheese in a food processor and dump it out into another bowl. Pulse flour and cayenne in processor. Add butter and process untill butter and flour are combined (until it "looks like cornmeal"). Pulse in cheese. Turn out on to the counter and knead by hand, adding a few drops of ice water if necessary (For me, it was necessary.).

Roll out into a rectangle about 1/4 inch thick. Cut into 1/2 inch strips as long as you like. Sprinkle with coarse salt. Bake on a greased cookie sheet for 5-8 minutes until golden brown.

Yield: A whole lot. Enough for a party.
The most time-intensive part of the whole process was rolling & cutting, which I did in batches. The dough was fairly crumbly, and did take some water to even barely come together. Like a pie crust, the colder the ingredients and the less water you use, the flakier & lighter these snacks will be. These did mix up very quickly and bake very quickly. I wish I had gotten a picture, but, as I said, they were made in a rush before we got out the door- no time for photos! They are NOT as orange as Cheez-Its because they are without the food coloring, mainly. The ingredients aren't terribly different: flour, cheese, butter/oil, salt, and spice (cayenne/paprika).

I know when I make MY junk food at home, I feel better about it!

8.25.2008

Fried squash blossoms

WOW. Just, wow.

I had said I was going to try to make these, but didn't have high hopes. A fried flower? Off the plant in my garden that has been the bane of my summer garden, taking over every square inch of surrounding beds? And not really producing much? (Number of squash harvested to date: Zero)

So, I was mad at the squash plant. I was determined I'd cook something it produces, even if I get no squash. Enter Squash Blossom.

While picking tomatoes today, I grabbed 8 blossoms to try frying them up, as I had seen on some other food blogs. I didn't expect to actually stuff them with anything, as I was only going to use what I had on hand, and I don't have much. I went to my handy-dandy Joy of Cooking cookbook to see what it had to say. It suggested a stuffing for the flowers that involved mozzarella cheese, Parmesan cheese, garlic, and basil, all ingredients I had on hand! So I decided I'd stuff some of them. Here's what I did:
Fried Squash Blossoms

Squash/zucchini/pumpkin blossoms
Flour
1 egg

Filling:
Shredded mozzarella
Parmesan cheese
1 garlic clove
Fresh basil

Cut garlic clove into tiny pieces. ear basil leaves into small pieces as well. Mix filling ingredients together.

Open each flower, check for bugs, and cut out pistil. Stuff filling (about a tablespoon's worth) into each flower and twist petals to seal.
Dip flower in egg, then flour, then fry in a pan with 1/2 inch of oil, until browned on both sides. Serve immediately as an appetizer or snack.
I loved the filling flavor in these, and the flower made a creative, convenient package for it all. Pretty cool use for all those useless male flowers on the VINE TAKING OVER MY GARDEN.

Sigh.

2.28.2008

Munchies without Guilt

I love sandwiches in pitas rather on bread, but pitas tend to go bad on me faster than a loaf of bread, so it's rare I can finish a whole package. Thus, I don't buy pitas very often.

When I do have them around, if I fear I won't be able to finish all of them, I make myself a snack- pita chips!

What you need:
Pitas
Cooking spray
Salt & other seasoning (I used dried basil, garlic powder, rosemary- whatever you like.)

Preheat oven to 350. Separate each pita into two rounds. Cut rounds into wedges of desired size (6-8 per round, probably). Place the wedges rough-side down on a baking sheet, and spray with cooking spray. Turn over and spray the rough side too. Sprinkle seasonings over wedges. Bake until edges are brown and chips are crisp - 12-14 minutes.


Light, fairly healthy, and great for munching! I've also served them in place of garlic bread as a side with spaghetti. The next challenge: making my own pitas.

Check out more healthy snacks at The Natural Mommy's Recipe Swap!

6.22.2007

Granola Bars

My sister is leaving for a long trip to Europe tomorrow (She's going to take "college classes"...) and I wanted to hang out with her one last time before she left. She wanted to have snacks for the long trip, and asked me for suggestions. I saw a perfect opportunity to make a snack I've been wanting to try: granola bars.
I had her bring everything in the recipe I didn't have on hand- things like nuts and "puffed rice cereal". Between planning a wedding and the upcoming trip, she was a very excited girl, so I assembled the ingredients while she talked a mile a minute. It was fun.

Homemade Granola Bars

Ingredients:
3 cups rolled oats (old-fashioned or instant)
1 cup pecans, chopped
1 cup sesame seeds

2 generous cups puffed brown rice cereal
2 cups dried fruit, chopped (We used cranberries and raisins. She brought apricots as well, but we forgot to add them.)

1 cup honey
1 teaspoon salt
2 tablespoons butter
¼ cup brown sugar
2 teaspoons vanilla

Directions:
Heat oven to 350 degrees Fahrenheit.
Spread first 4 ingredients on 2 baking pans and toast for about 15 minutes, or until you can smell the aromas from the toasted nuts. Keep an eye on them- we discovered these can burn quickly, especially on a dark cookie sheet.
When oat mixture is toasted, mix in the fruits and the rice cereal in a bowl.

Meanwhile, heat the honey, salt, sugar, and butter in a small saucepan over medium-low heat until ingredients are well combined. Remove from heat and stir in vanilla.

Add the mixture to the oats and mix well.

Spread the mixture evenly into 2 greased/buttered pans. How thick? Your choice. (We actually put them in one big pan, and forgot to grease the pan. Oops. It probably about an inch thick.)

Press firmly so that everything sticks together. (We didn't do this as well as we should have. This is important.)
Bake for about 20 minutes, until the granola turns golden.

When you take the granola out of the oven, only let it cool a little bit before you slice into bars. Wait until the bars are completely cool before you remove them from the pan. (We didn't wait for them to cool before removing the first couple from the pan. They fell apart. I put the whole pan in the fridge and cut the bars the next day, and they stuck together as they should.) Wrap bars individually with plastic wrap, and they should keep for at least two weeks.

This made A LOT of bars- probably close to twenty. They are delicious, and my sister is well stocked for her trip. Overall, they're a pretty healthy snack- just a little sugar and a little butter. Assembling them with my sister was fun, and good quality time. A bonus: I mentioned we forgot to grease the pan. Anything that stuck, I scraped off and put into a bag as "(sticky) granola trail mix"! It's just as good as the bars, just in smaller pieces!

We did make some less-healthy 'sweet' granola bars with a different recipe, and M&M's. They turned out too sweet, so I may post the recipe, edited, and I may not. I'll have to eat another one to make that decision :)

Fresh salsa

1 lb tomatoes, diced
1 small onion, finely diced
juice of 1 lime
2 serrano chilies (stems, ribs, seeds removed), finely diced
about 1/2 C fresh cilantro, chopped

Dice tomatoes & onions. Be very careful when cutting the chilies- use a fork and a knife, or, if you must touch it, guard your hand with gloves or a paper towel and wash with soap and water afterwards. Don't touch your eyes.

Combine tomatoes, onions, chilies, and cilantro, top with lime juice and toss. Let flavors combine in the refrigerator for at least an hour before serving. Makes about three cups. In my case, it was an appetizer for 10 with none left over (It lasted through a bag and a half of tortilla chips).

6.19.2007

My Summer Challenge

I've mentioned the farmer's market a few times so far. This week, we rode our bikes there Saturday morning and I bought tomatoes and onions. Next week I will need to get some more eggs. We also ventured to Joe's Butcher Shop, a local meat market in the trendy part of town that has local meat, dairy, cheese, and pasta. We bought some brats and sausages, and plan on going back for more food in the future.

Why all this talk about local food? I've been reading up on it some, and it's a good idea. The food is fresher- it doesn't have to travel as far, so the harvest-to-dinner-table time is less. Because it's not traveling as far, less energy is being used to transport it, which is good for the environment. Buying locally also supports the local economy, and often the local farmers are also the smaller family farms. There's lots of other good reasons- what have you heard/experienced with local food?

Oh, and I'll be talking about it all summer, and trying to make at least one "local meal" a week, thanks to the challenge put forth by Liz at Pocket Farm. The One Local Summer Challenge is in its second year, and the bloggers participating will post once a week about their local meal, to encourage each other and give each other ideas. I need all the ideas I can get. I haven't figured out yet where to get local grains like flour, bread, and pasta, for example. I'm also not used to basing a meal choice for the week on what's in season- though I know this is better for us. I've got a lot to learn, and I'm willing to try. I also need to learn how to do this local-food shopping within our grocery budget. Any tips anyone has for how to go about this- while in a suburban apartment where I'm unable to stockpile large amounts of anything, or grow much of my own - would be greatly appreciated.

Oh, and thanks to El at Fast Grow the Weeds for being the Midwest round-up person. I'll find lots of good ideas from those bloggers in similar areas.

The challenge doesn't start for a week, but I gave local cooking a try this weekend, making salsa from the tomatoes and onions from the farmer's market and cilantro from my balcony garden. I did use a couple chilies and a lime from the grocery store, so I don't totally have this local-food thing down. If I can't even make this snack from local ingredients, will I be able to make an entire meal? We shall wait and see... Keep on the lookout for my attempt next week.

3.27.2007

A birthday and a Bowl

Originally posted on 2/4/07 at keeping feet


Sunday, while we were housesitting, I cooked Josh a birthday cake to take to bible study Monday night. It turned out fairly well. I used a tip that Melissa gave me last year and filled between the layers with pudding rather than icing, but I think I used too much, so it began oozing everywhere and making a mess while I was trying to ice the cake. The dark spots in the icing is where the pudding got mixed up with it and didn't dry very well. Ah, chocolatey goodness (More on that later).
The cake was from a mix, to simplify things, but I found a recipe for the icing that was really, really good.
Easy Chocolate Buttercream Frosting:
1 stick butter, room temperature
2/3 C unsweetened cocoa
3 C powdered sugar
1/3 C milk
1 tsp vanilla extract

Combine all ingredients in a large bowl and beat with an electric mixer, until frosting is creamy, 3-5 minutes. (Start at low speed to avoid getting sugar everywhere!)

I didn't have 3 C powdered sugar, I only had 2, so I tried to cut teh recipe into 2/3rds, which was hard to do in my head....

The cake was completely gobbled up by the 10 hungry people at small group Monday, and my parents were coming to celebrate Josh's birthday on Tuesday. What's a hostess to do? I threw together one of Josh's favorites, "pudding cake" (also called "dump cake" or "hot fudge cake") as they got here. There are no pictures, because it was gobbled up as well.
Pudding Cake:
3/4 C sugar
1 C flour
3 Tbsp cocoa
2 tsp baking powder
1/4 tsp salt
-Heat oven to 350. Mix above ingredients in a 8x8 or 9x9 pan. Blend in 1/2 C milk, 1/3 C melted butter, & 1 1/2 tsp vanilla and beat till smooth.
-Sprinkle 1/2 C sugar, 1/2 C brown sugar & 1/4 C cocoa over batter. Pour 1 1/4 C HOT water over the pan. Do not mix. Stick it in the oven & bake 40 minutes. Let stand 15 minutes before eating.

What I did NOT consider was that chocolate cake 2 days in a row makes us very sick of chocolate cake. I had planned on making a cake or cupcakes for a party today, and after Tuesday, we decided they would be white cake, for sure.

Wednesday I had off from cooking anything amazing. We did a breakfast-dinner, and I appreciated the simplicity of it. Thursday, Matt, Kristen, Cindy & Ducky all came over for dinner. It was great fun. Matt brought sausages and Josh braved the cold to grill them. I made pork-and-beans and (my favorite) garlic roasted potatoes, and Cindy made yummy brownies for us.
I would post the potatoes recipe, but, to be honest I didn't follow it at all. It was just an 'idea'. What I did: Start with a bag of red potatoes. Cut into wedges and toss with oil to coat. Spread in a baking pan skin-side-up and sprinkle with dried rosemary and garlic powder. Bake for 20 minutes covered with foil at 425. Uncover and bake for 15 minutes. Flip skin-down and bake for another 10-15 minutes.

Again, no pictures because this was gobbled up. I really meant to get pictures of the party, it was a good time.


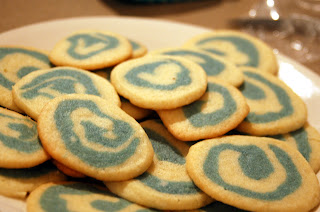
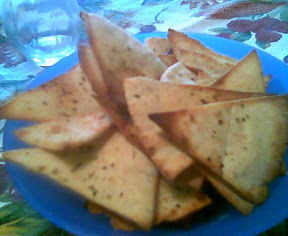
Also Thursday night, before people started showing up, I cooked my own creation: Super Bowl Colts cookies to take into work Friday. By "Colts" I mean "blue and white". I told people at work they could be blue-and-white Groundhog Day cookies if they prefer. What I did:

I started with Betty Crocker's sugar cookie mix, as I always do for my sugar cookies. I added a little bit of flour (In retrospect, I probably should have also taken out some of the butter). I split the dough into 2 pieces, one slightly smaller than the other. To the smaller one, I added blue food coloring until I liked the color, worked it into the dough, and set it aside. I rolled out the white dough into a long narrow rectangle, and spread the blue dough on top of it. Starting from the LONG side, I rolled the dough into a tube and wrapped it in saran wrap and put it in the refrigerator to chill. (I forgot, I did this all while Josh was at choir Wednesday night) Thursday, I took the roll out and sliced these spiral cookies and cooked them in batches. (I managed to slice my finger as well, and have had to type this whole thing without the use of my left index finger. It's still there, it just has a band-aid on the tip.) They turned out pretty cool, and were eaten up at work.

My favorite part: The spirals sometimes appeared to form horseshoes or C's, for Colts.

Posted by Picasa

Last night, before we went to Lebanon, I threw together a spinach dip for a party tonight. This is the easiest, tastiest thing to do: Knorr spinach dip. If I have time, I might add more spinach, because I prefer spinach to sour cream.

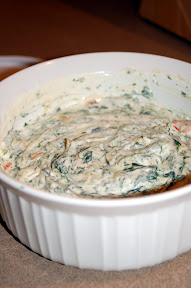
I made it ahead because it gets better with age: the flavors meld while sitting in the refrigerator. We headed to dinner in Lebanon and had a delightful time playing games and visiting. We ate lasagna and even more chocolate cake.
-------EDIT-------
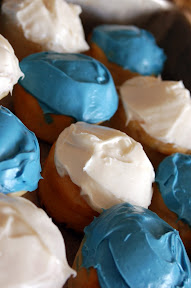
The cupcakes for yesterday's birthday party for Dave went over very well. They were cooked from a white cake mix from ALDI with a white icing also from ALDI. I added blue food coloring to half the icing. This was my first attempt at cupcakes, and first time using the silicone cupcake pan, which I decided I like very much. The downside: I only have 1 cupcake pan, which holds 6 cupcakes, so the 24 cupcakes I cooked took a total of 4 batches.


Cooking today will include sides for dinner when we eat in Muncie with Matt and watch the football game. I'll leave you with a picture I shot while on our way to Josh's parents house for dinner Friday night:
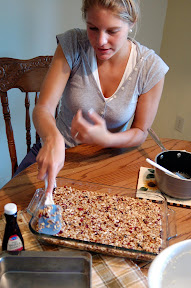
Pita chips

An excerpt from a post from keeping feet originally posted on 11/11/06


I did a cooking experiment this week and made pita chips, mostly inspired by this recipe, but I didn't print it out, so I had forgotten the details and cooked the pita chips at too high a temperature and for only 5 minutes. They were crisp and well-seasoned, and a good use for the pitas in the fridge. We ate them as a side with spaghetti and meatballs.

3.26.2007

New Food

Everyone has to start somewhere. Grilled Peanut butter and jelly, originally posted 10/14/05

Today I tried something new for lunch- a grilled peanut butter and jelly sandwich. It was a very sweet treat. I made the typical PB&J, buttered the outside, and stuck the whole thing in my handy-dandy grilled sandwich maker. Delicious.
The only downside: Melted jelly is very hot when it drips out of the sandwich. Messy, but worth it.

Followers